[Kubeflow] 모델 학습부터 서빙까지 파이프라인 구축하기
들어가며
이 글은 kuebeflow 파이프라인를 활용해 모델 학습부터 서빙까지 자동화하는 방법을 설명합니다. 파이프라인 구축에 필요한 모델 및 서빙 방법은 아래 링크에서 설명한 예제를 활용할 예정이므로 연결된 글을 먼저 읽은 다음 이 글을 읽는 것을 권장합니다.
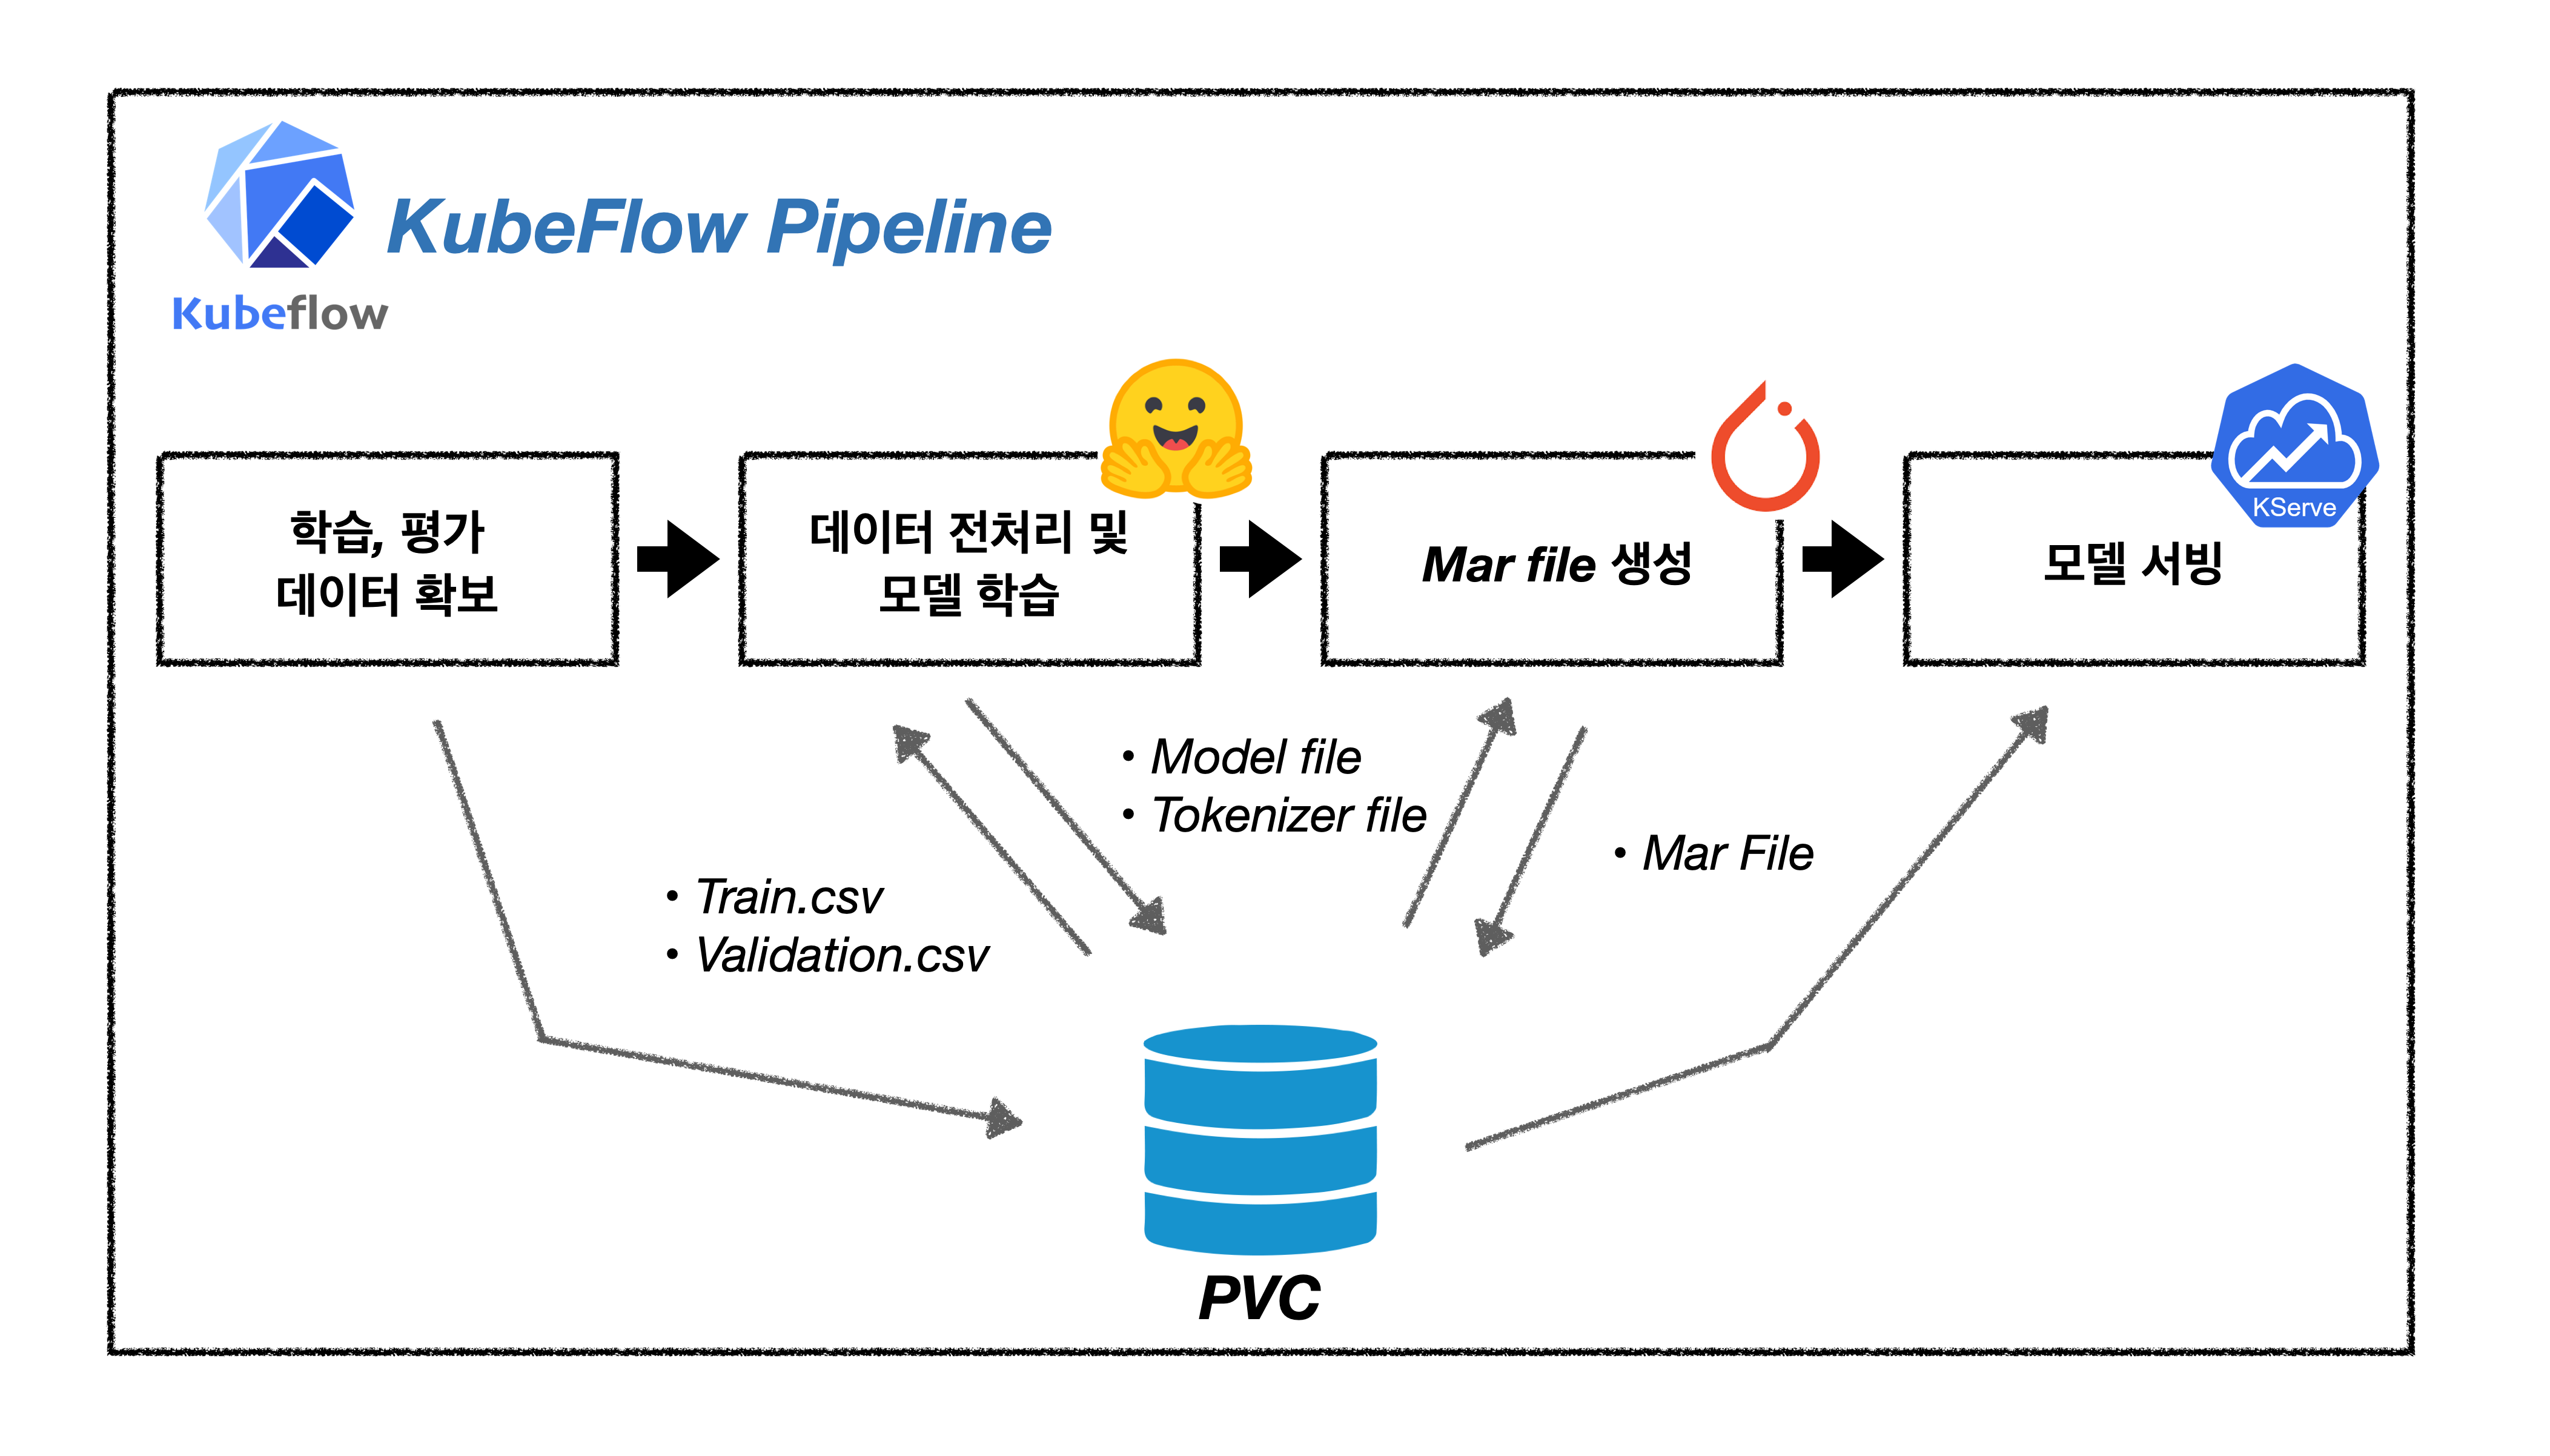
이번 예제에서 구현하고자 하는 파이프라인은 아래 그림과 같은 흐름을 가집니다. 모든 단계는 kubeflow의 파이프라인을 통해 수행되며, 수행 과정은 학습 평가 데이터 확보, 모델 학습, 서빙에 필요한 데이터 생산, 서빙 순입니다. 이때 개별 컴포넌트의 결과물은 사전 설정한 Storage에 저장되며 모든 컴포넌트에서 접근 가능하고, 파이프라인 외부에서도 결과물을 확인할 수 있도록 설정할 예정입니다.
KFP SDK 이해하기
KFP SDK는 kubeflow 파이프라인을 python에서 활용할 수 있는 라이브러리입니다. KFP SDK를 활용하면 kubeflow 파이프라인 실행에서 발생하는 번거로운 과정을 생략할 수 있어 서빙부터 배포까지 모든 과정을 편리하게 진행 할 수 있습니다.
KFP SDK 설명에 앞서 KFP SDK를 사용하지 않고 kubeflow의 파이프라인을 활용하는 일이 얼마나 번거로운 일인지에 대해 간단히 설명하도록 하겠습니다. 아래의 그림은 KFP SDK를 사용하지 않는다면 사용자가 어떻게 kubeflow 파이프라인을 사용해야하는지를 보여줍니다.
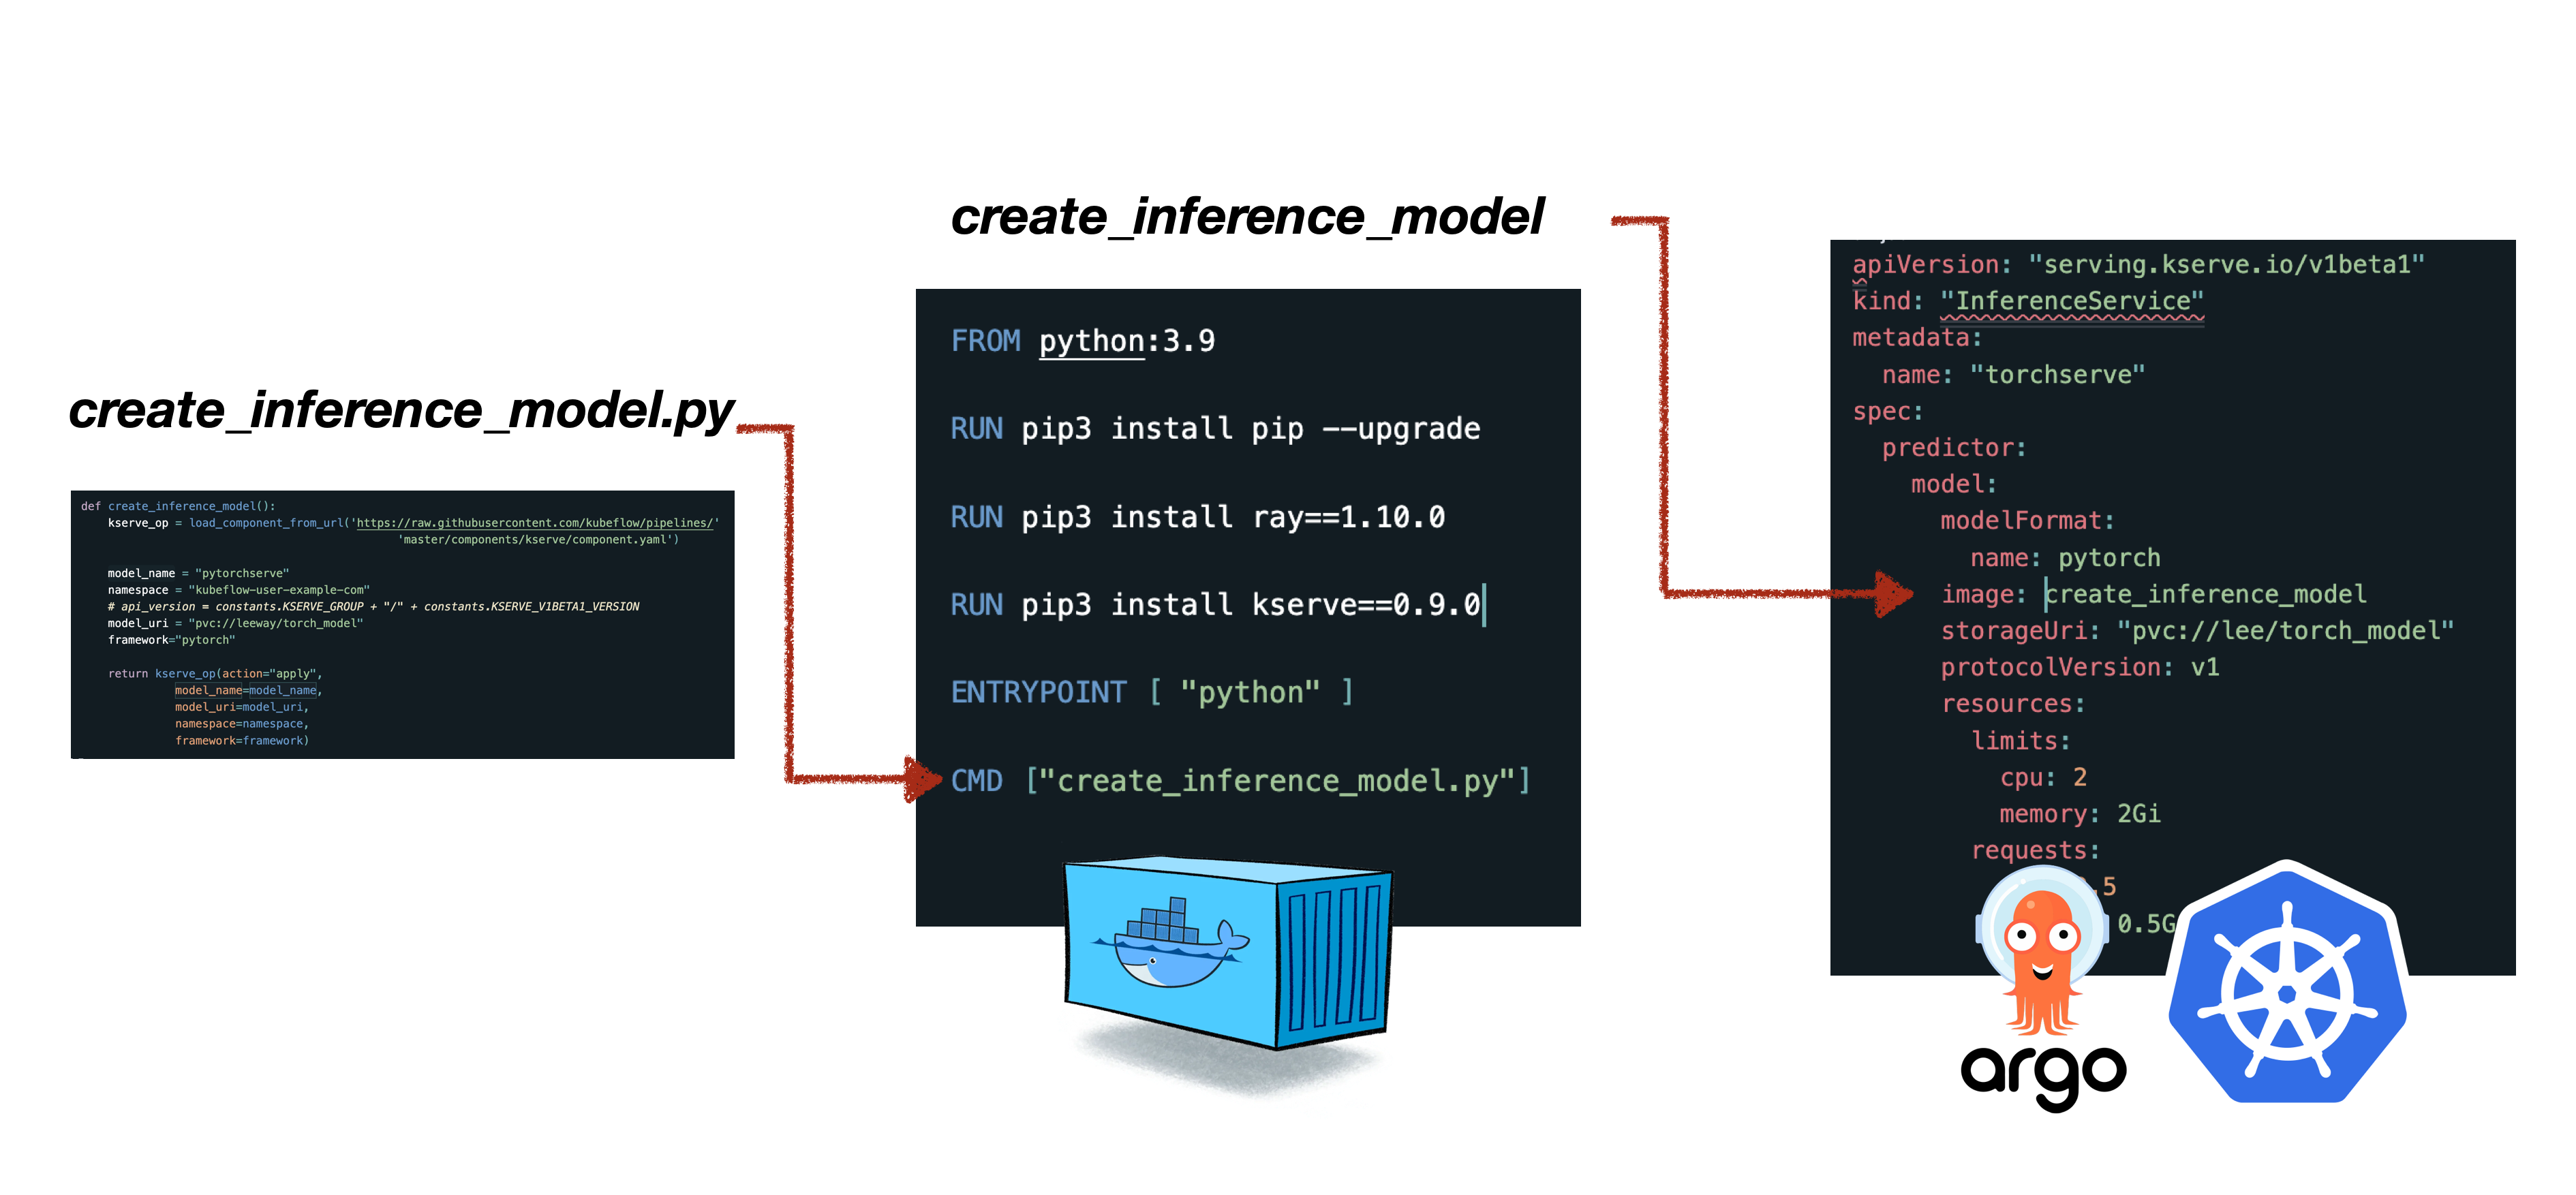
사용자는 파이프라인에서 실행될 코드를 작성합니다. 관련 코드를 실행하는 컨테이너 빌드를 위해 도커파일을 작성하고 이미지를 생성합니다. 빌드한 컨테이너를 kubeflow 파이프라인으로 구동하기 위해선 ARGO CRD에 맞는 양식으로 yaml 파일을 작성해야합니다. yaml 파일까지 작성했다면 이제 파이프라인 실행을 위해 Kubeflow dashboard에서 파이프라인을 등록해야합니다. 파이프라인을 등록하기 위해선 Experiment를 생성이 필요하므로 Kubeflow dashboard Experiment 항목에서 이를 생성합니다. 파이프라인 등록까지 마쳤다면 마지막으로 파이프라인 실행을 위해 Kubeflow dashboard의 RUN 항목으로 넘어가 실행합니다.
KFP SDK 사용없이 쿠버네티스로 파이프라인 사용하는 예제를 알고싶다면 titanic-kaggle-competition 예제를 참고하세요.
이런 과정을 한 두 번 정도 경험하는 것은 그다지 불편하지 않을 수 있습니다. 하지만 디버깅을 해야하는 상황이나 빠르게 학습하고 배포해야 하는 과정에서 이 과정을 수십번을 넘게 반복 한다면 이것만큼의 비효율은 없을 겁니다. KFP SDK는 이러한 번거로운 작업을 몇 줄의 코드로 자동화 할 수 있으며 모델 서빙단계까지도 한 번의 실행으로 완료 할 수 있습니다.
지금부터는 KFP SDK가 어떠한 방식으로 작동되는지, 어떻게 불필요한 작업을 줄여주는지에 대해 설명하도록 하겠습니다.
❖ 파이썬 코드를 컴포넌트로
KFP SDK를 접하면 가장 먼저 배우는 매서드는 func_to_container_op와 create_component_from_func 일 것입니다. func_to_container_op와 create_component_from_func은 앞서 설명에서 파이썬 코드를 도커 컨테이너로 빌드하는 단계에 대응되는 과정입니다. 이 매서드를 사용하면 py 파일을 만든 다음 일일이 이미지로 만들었던 작업을 생략할 수 있습니다. KFP SDK로 파이프라인을 compile한 yaml 파일을 보신분들은 아시겠지만, 컴포넌트로 감싸여진 파이썬 코드는 컨테이너 내부에서 python 명령어에 arguments를 붙여넣는 방식으로 구동됩니다.
이 방식은 컨테이너 이미지를 생성하는 단계를 생략한다는 장점이 있지만 약간의 단점(?)도 존재합니다. resource requests,resource limits, volume mount와 같이 컨테이너 실행 시 설정하는 값을 create_component_from_func와 func_to_container_op로는 설정할 수 없다는 점입니다. 예로들어 create_component_from_func 매서드는 packages_to_install, base_image, annotations 만을 지원하고 있기 때문에 이러한 매서드를 사용할 때 resource requests,resource limits, volume mount는 같은 세부적인 옵션은 설정할 수 없습니다.
그렇다면 resource requests,resource limits, volume mount 같은 쿠버네티스 설정은 어떻게 컴포넌트에 적용해야할까요?
먼저 아래 코드를 실행해 봅시다.
from kfp.components import create_component_from_func,func_to_container_op
@create_component_from_func
def test_component():
	pass

@func_to_container_op
def test_container_op():
	pass

print(type(test_component()))
print(type(test_container_op()))

>>> <class 'kfp.components._structures.TaskSpec'>
>>> <class 'kfp.components._structures.TaskSpec'>
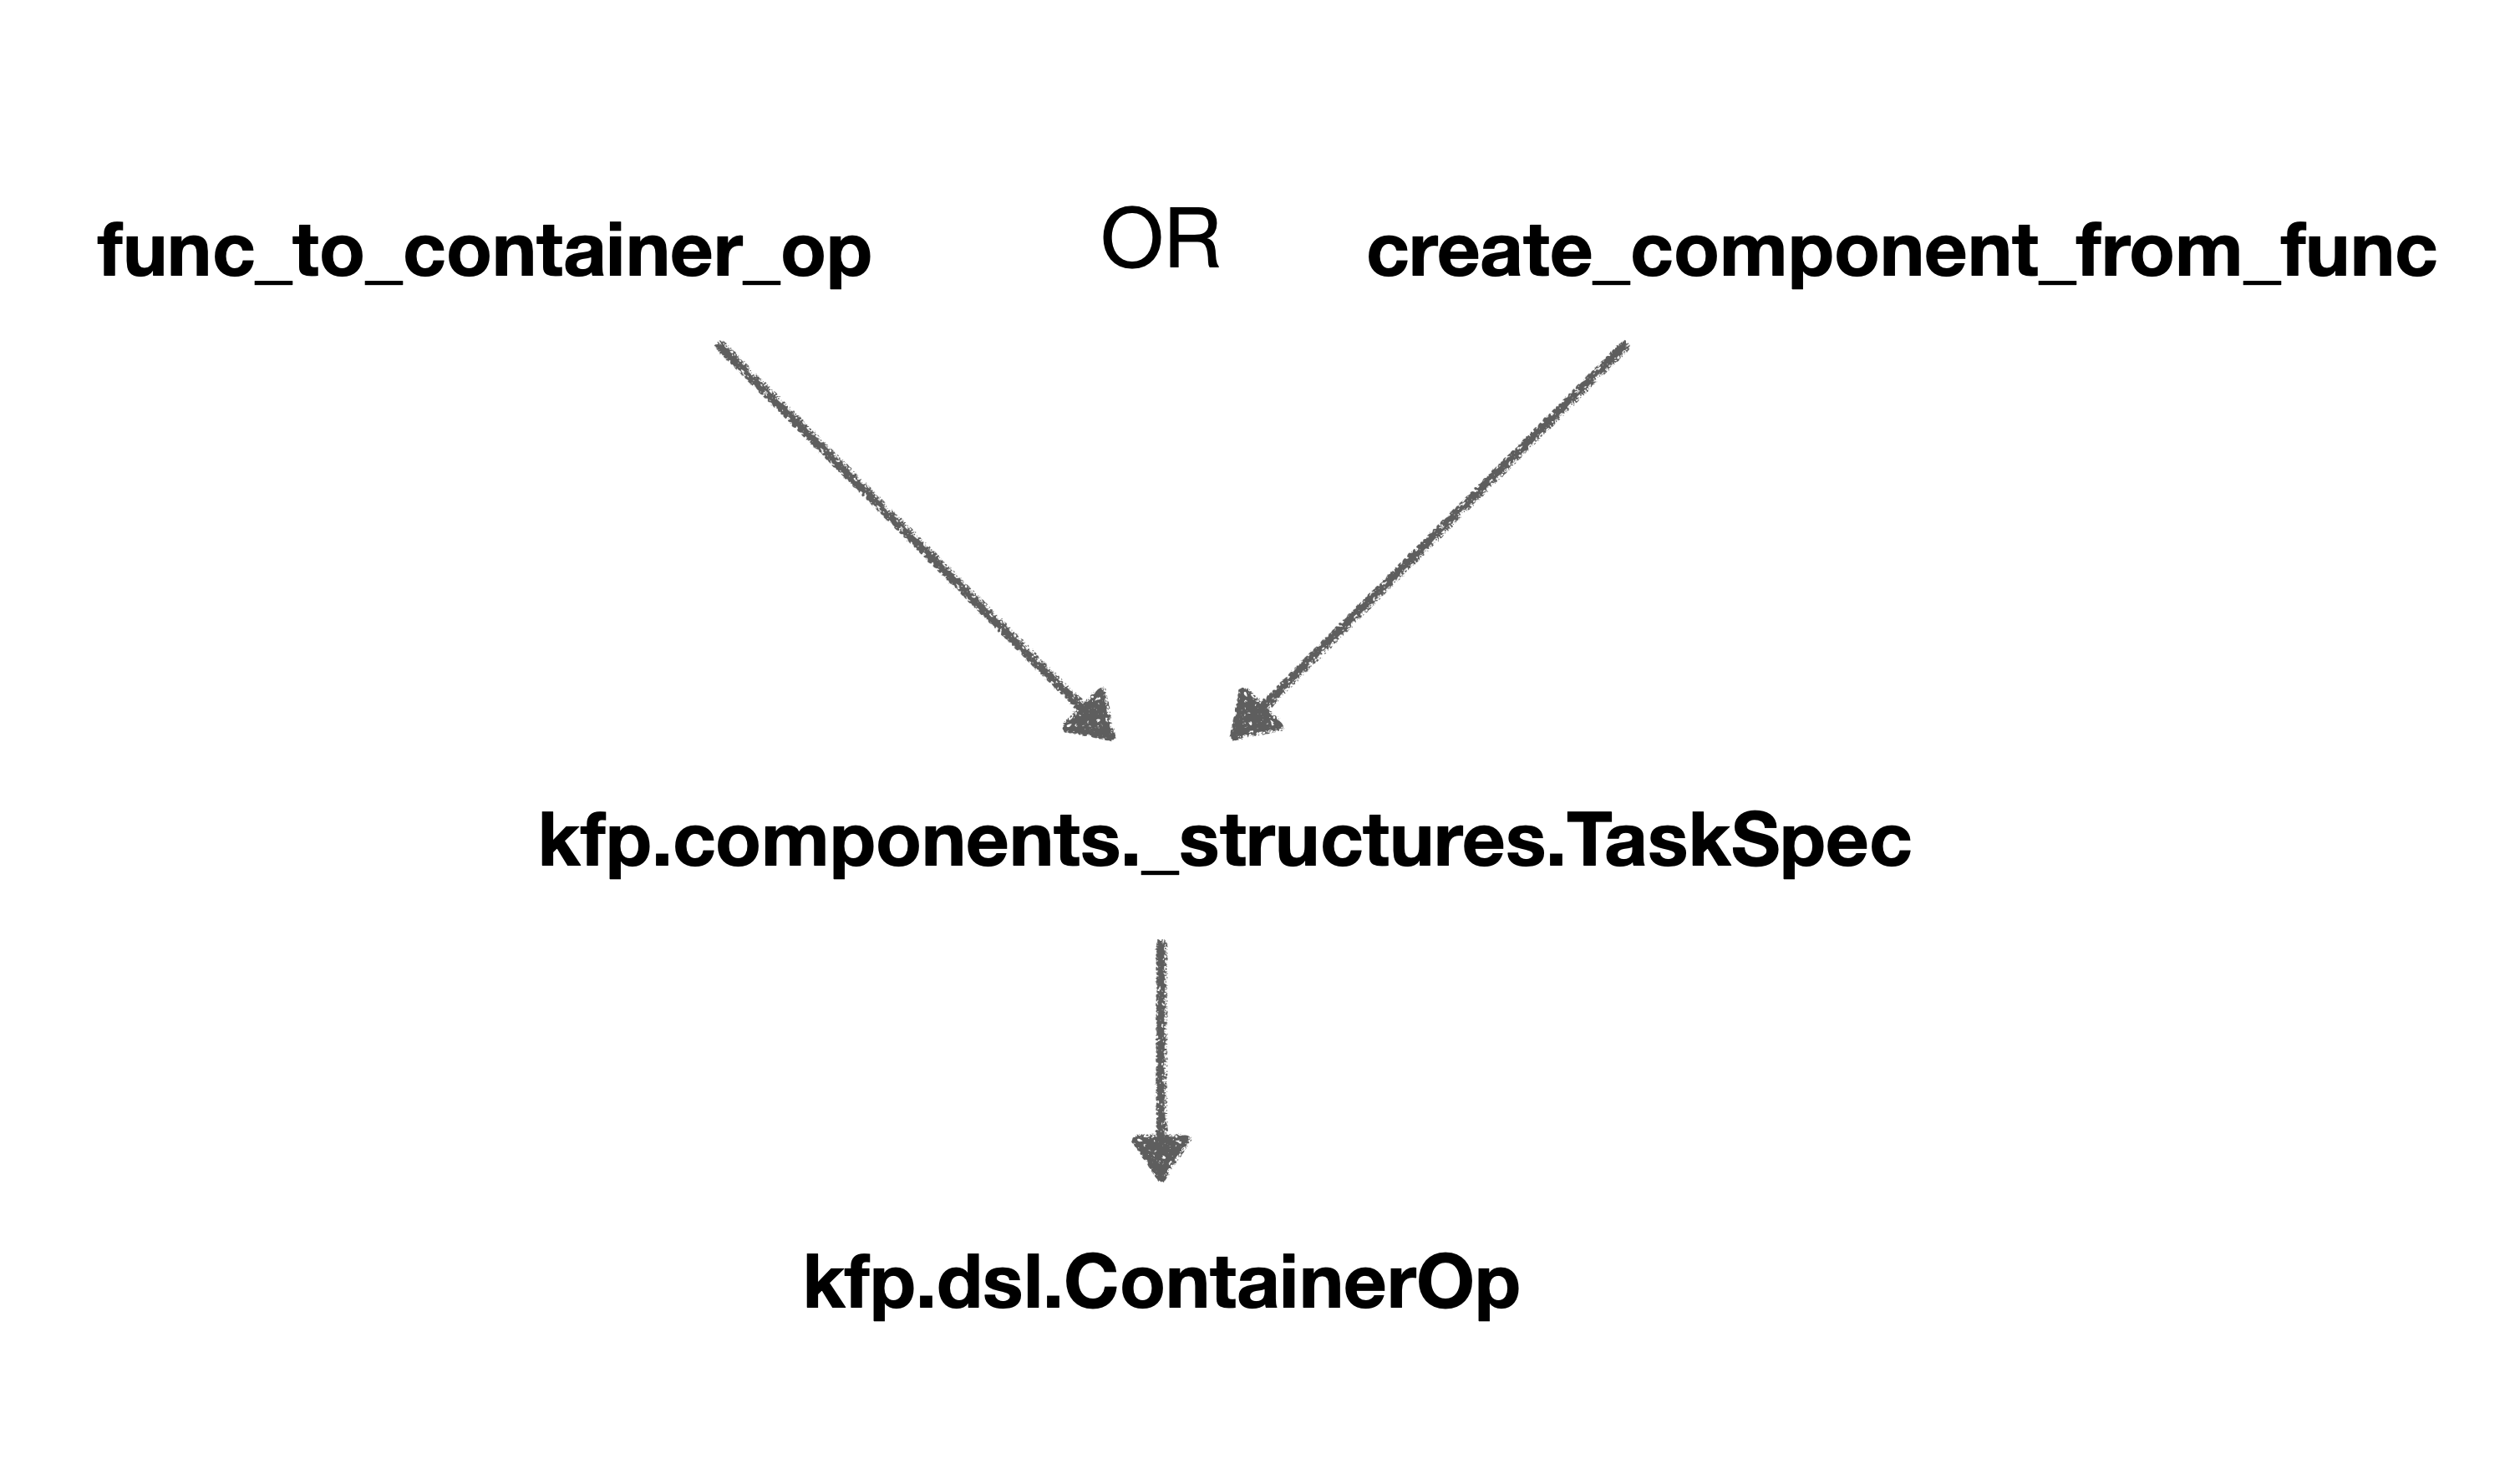
함수 실행결과 두 함수의 타입이 kfp.components._structures.TaskSpec로 동일한 것을을 확인할 수 있습니다. kfp.components._structures.TaskSpec 타입은 파이프라인 내부에서 실행되면 kfp.dsl.ContainerOp 클래스의 객체를 반환합니다. 즉 create_component_from_func로 생성한 컴포넌트는 파이프라인 실행 시 kfp.components._structures.TaskSpec을 거쳐 kfp.dsl.ContainerOp 클래스로 변환되는 것을 알 수 있습니다.
그렇다면 create_component_from_func는 왜 kfp.dsl.ContainerOp 클래스로 변환되는 걸까요?
그 이유는 우리가 앞서 궁금해했던 resource requests,resource limits, volume mount 같은 쿠버네티스 옵션을 kfp.dsl.ContainerOp 클래스를 통해 설정할 수 있기 때문입니다.
이게 가능한 이유는ContainerOp 클래스가 쿠버네티스 SDK의 클래스 중 하나인 V1container를 기반으로 구현됐기 때문입니다. 따라서 ContainerOp 내부에서 최종적으로 쿠버네티스 SDK를 활용하므로 쿠버네티스 설정 값을 적용할 수 있게되는 것입니다.
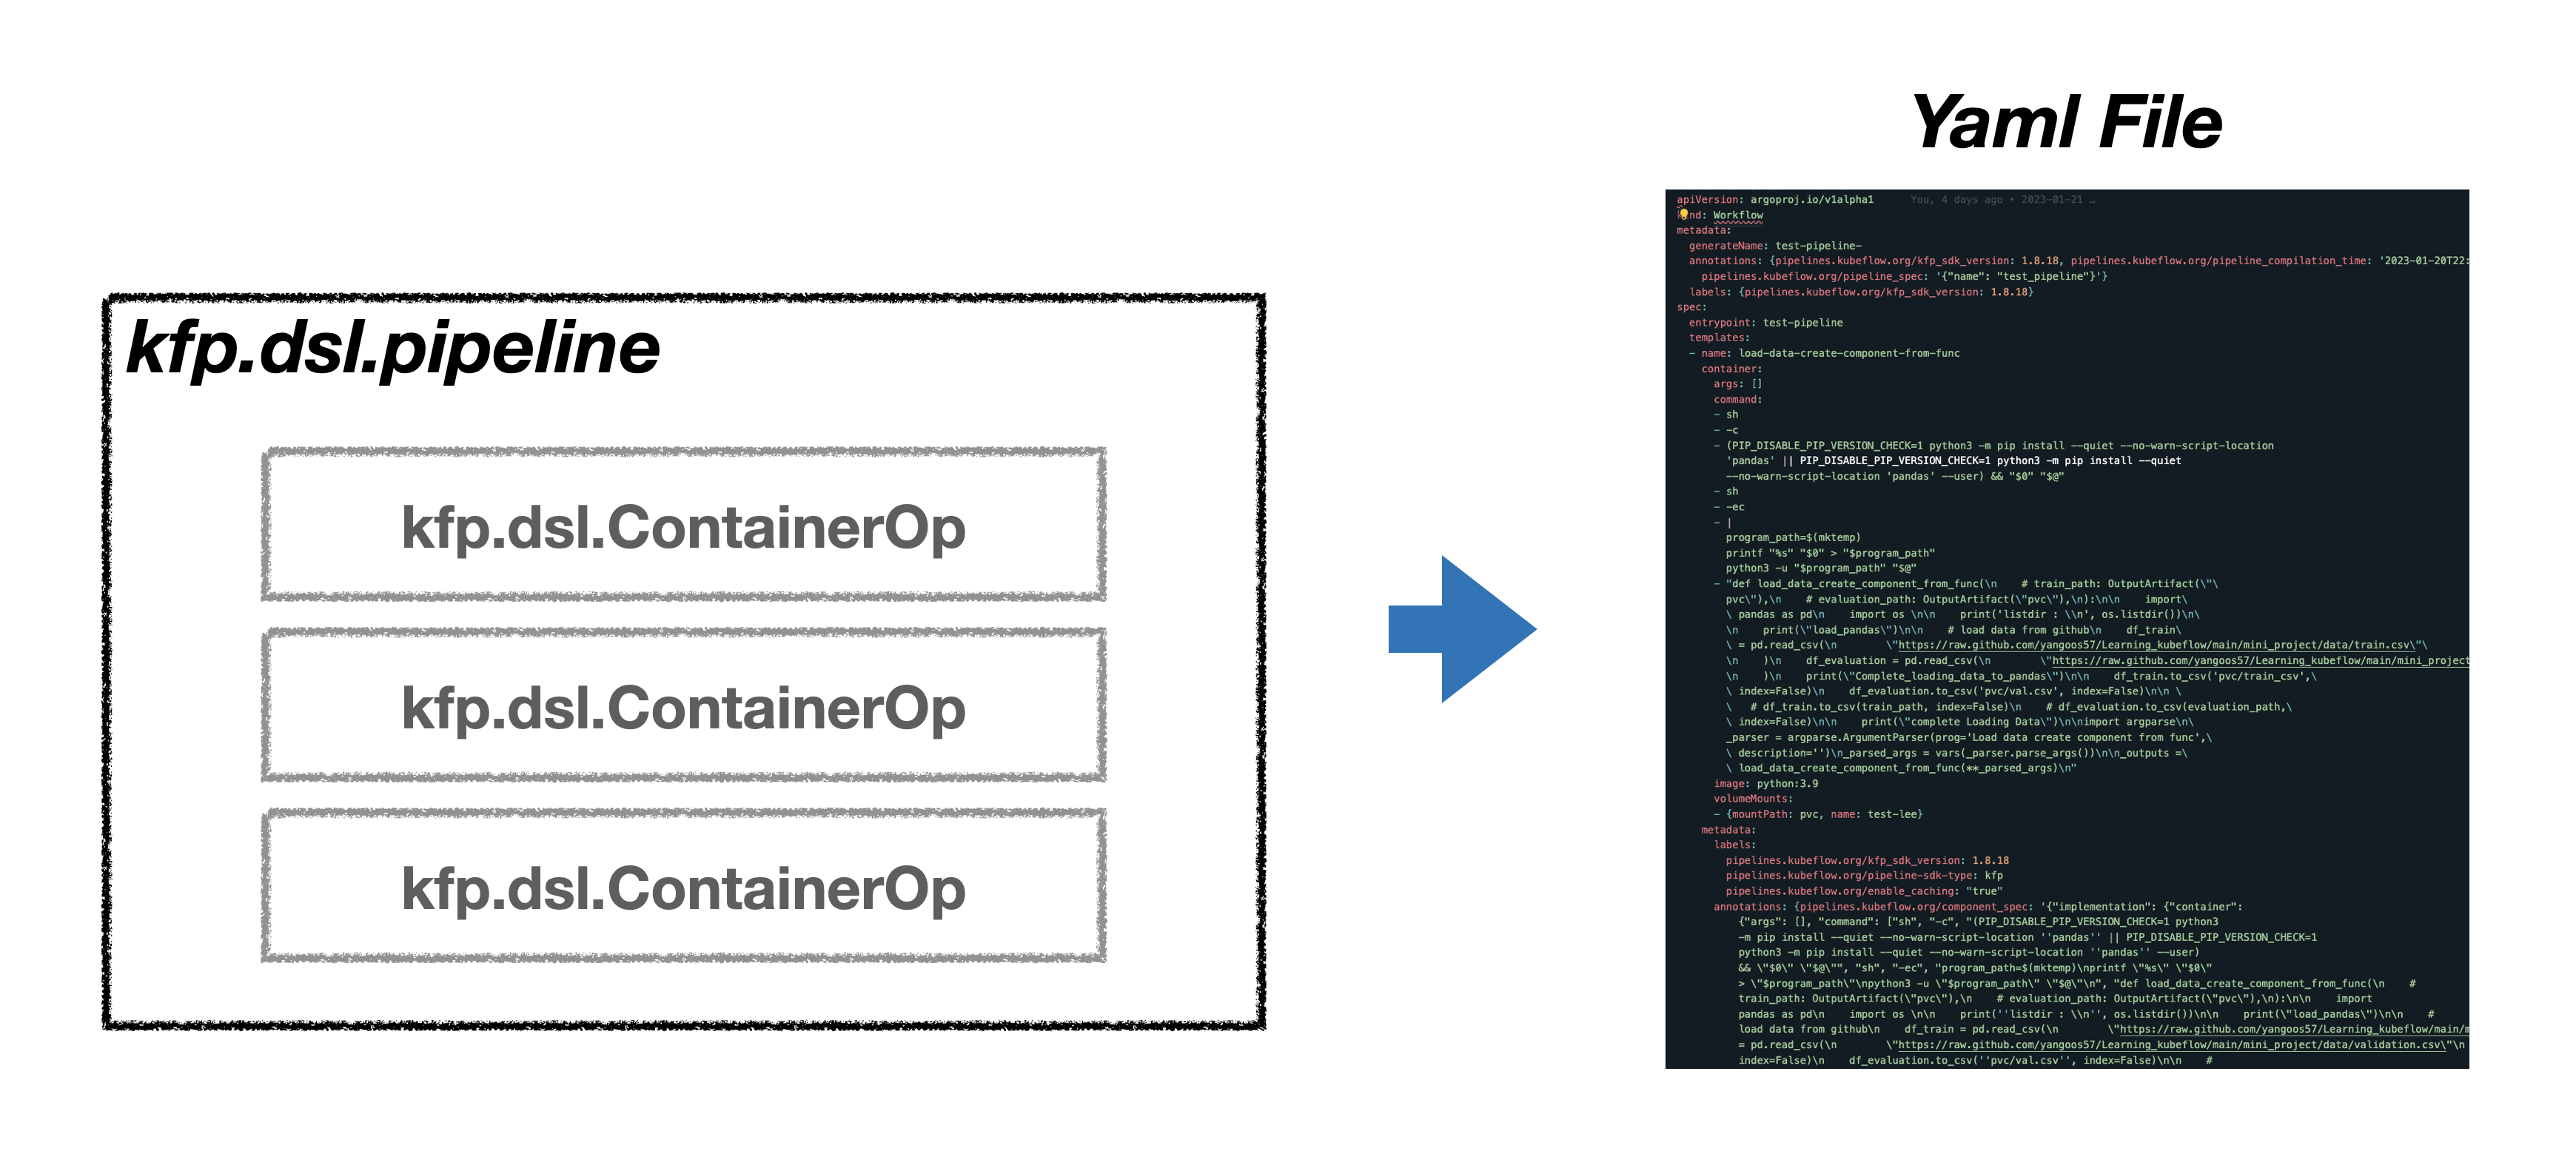
❖ 컴포넌트를 파이프라인으로 구축
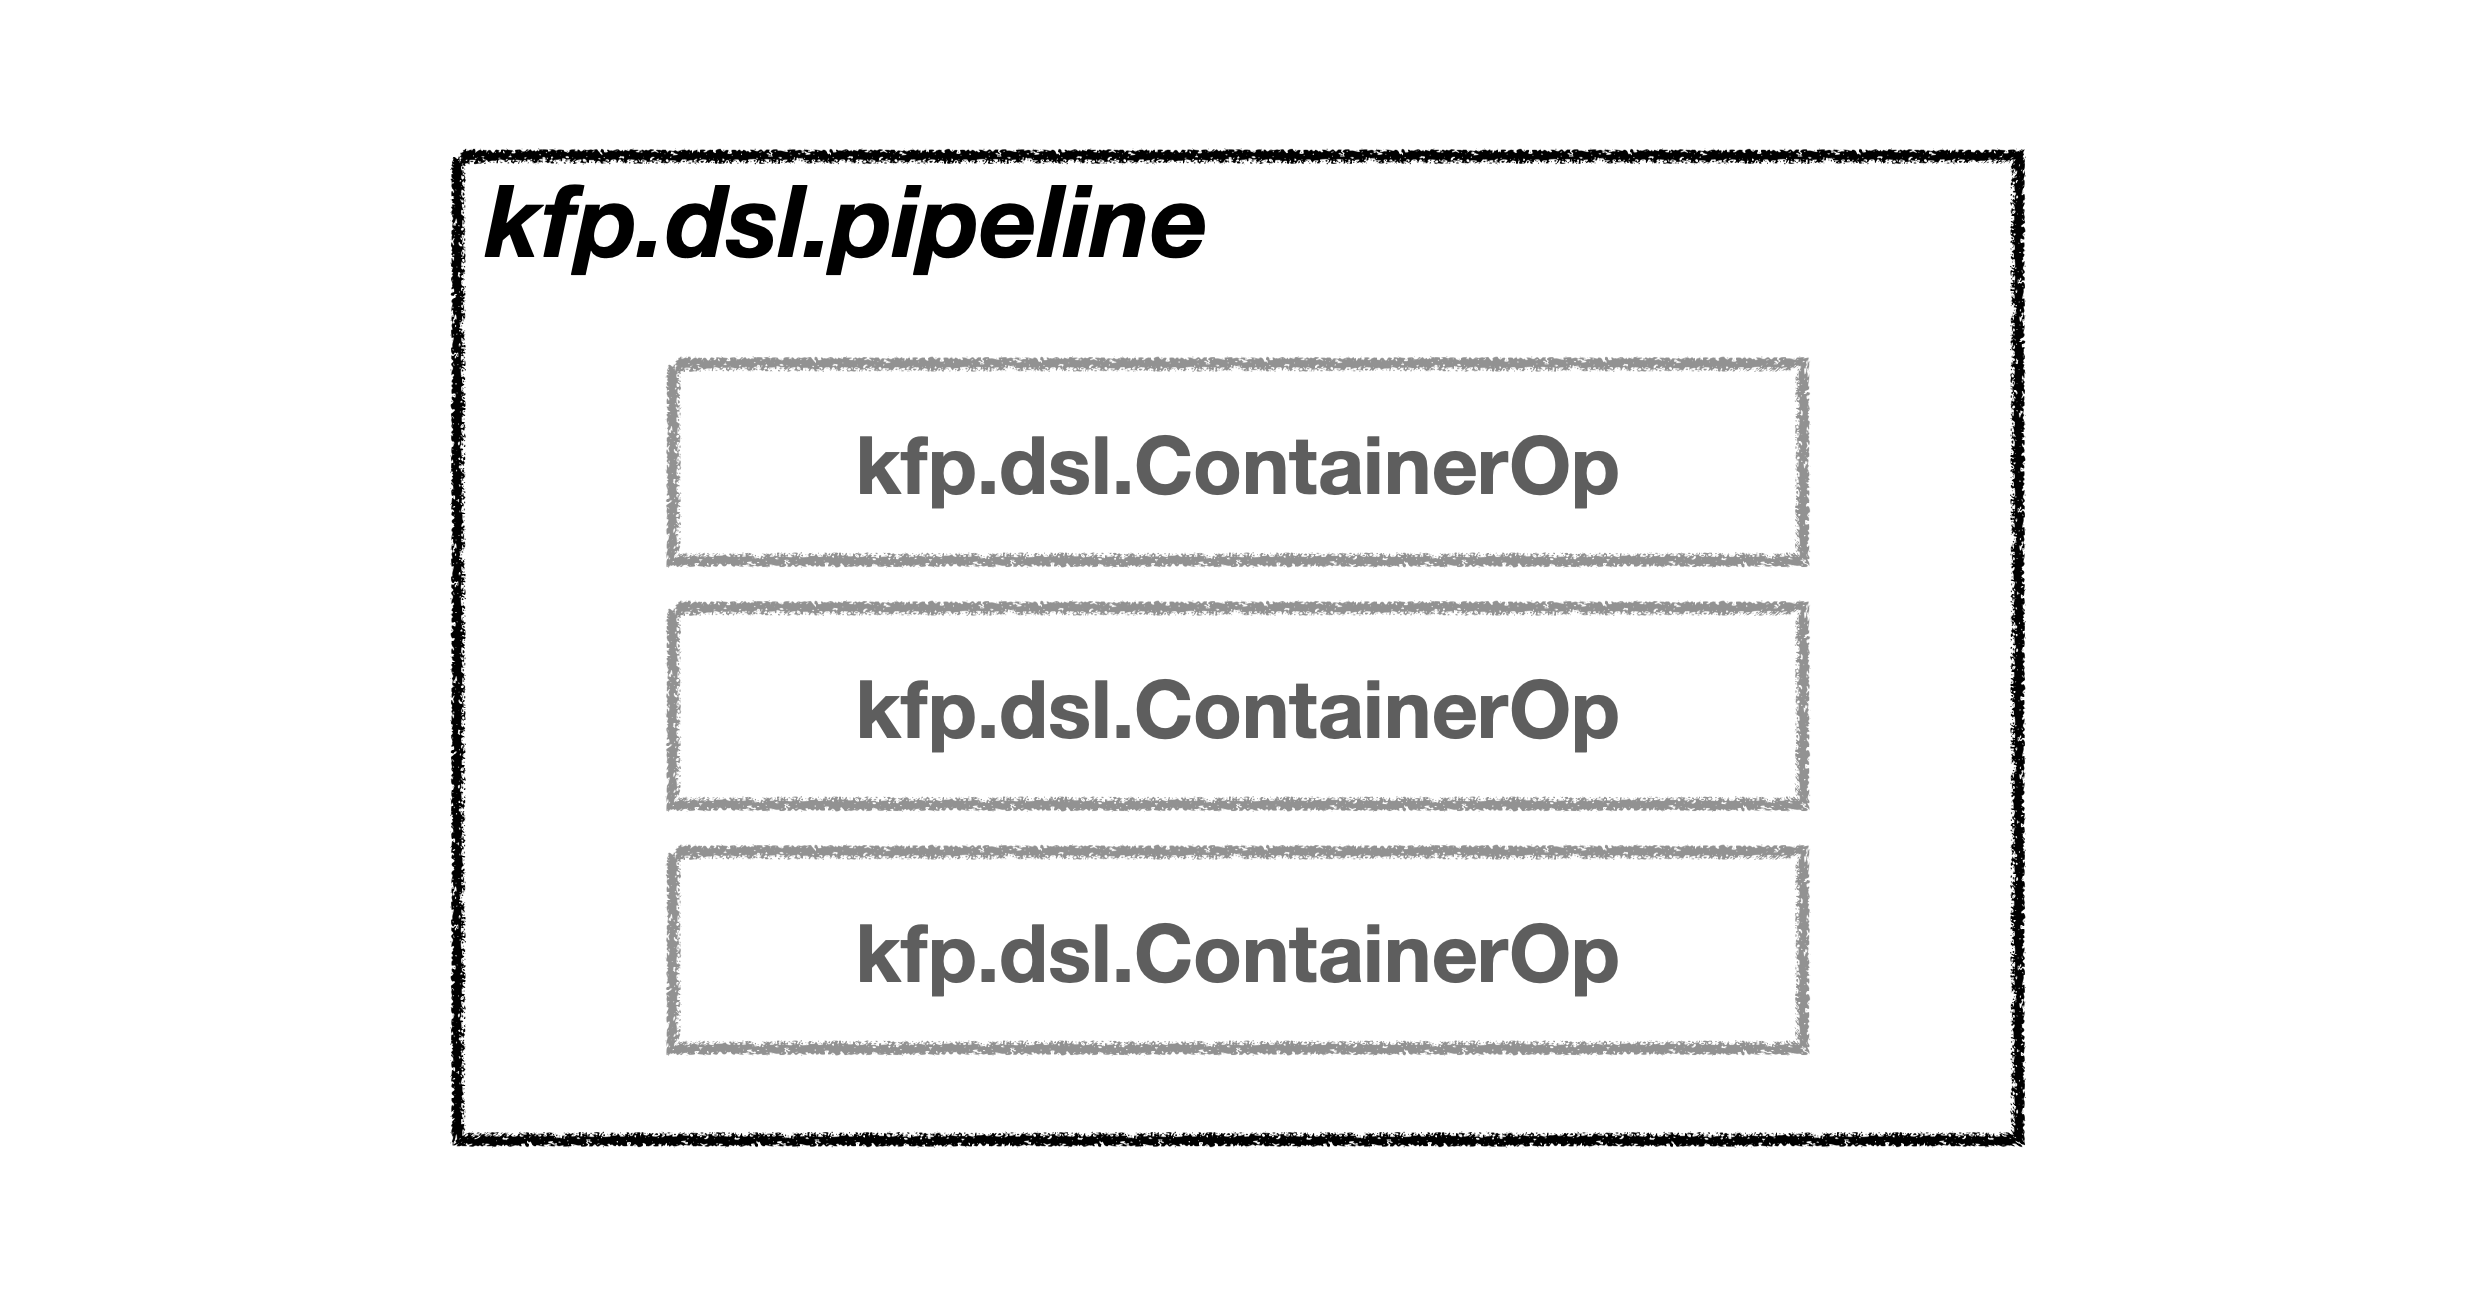
파이프라인은 아래 그림과 같이 컴포넌트들을 감싸는 구조입니다. 그리고 이 파이프라인은 argo라는 workflow 위에서 실행됩니다. 파이프라인 내부의 모든 컴포넌트는 kfp.dsl.ContainerOp 클래스로 변환된 상태이며 ContainerOp 클래스에서는 컴포넌트에 쿠버네티스 설정 값을 적용할 수 있습니다. ContainerOp은 쿠버네티스 설정 외에도 argo 실행시 활용되는 설정 값을 적용할 수 있습니다. 예로들면 컴포넌트의 실행 순서를 설정하는 after, 파이프라인 UI에 표현된 컴포넌트에 대한 설명을 변경할 수 있는 set_display_name 매서드가 그러합니다.
❖ 파이프라인 컴파일
파이프라인 구동에 필요한 모든 세팅을 완료했다면 KFP를 실제 이용하기 위해서 파이썬 코드를 yaml 파일로 컴파일하는 과정을 거쳐야 합니다. 물론 KFP SDK을 활용하면 별다른 수고없이 yaml 파일을 손쉽게 만들 수 있습니다. 사용자는 파이프라인 생성, 구동에 필요한 yaml 파일 생성을 KFP SDK를 통해 자동화 할 수 있으므로 앞으로 해야할 과정은 yaml 파일을 Kubeflow dashboard에 있는 Pipeline 항목에 업로드하고, Experiment 항목으로 이동해 Experiment를 생성한 뒤 실행 버튼을 누르는 것만 수행하면 됩니다. 이 모든 과정은 kubeflow UI에서 진행되므로 직관적이고 어렵지않은 과정입니다.
하지만 이러한 편리함도 파일 수정, 업로드 실행 과정을 수십번 반복하다보면 상당히 고통스럽고, 비효율적으로 느껴질 수 있습니다. 다행이도 KFP SDK에는 파이프라인을 자동으로 실행하는 방법 또한 지원하고 있습니다. 이 방법을 통해서 나머지 해야 할 일도 자동화로 진행해 보겠습니다.
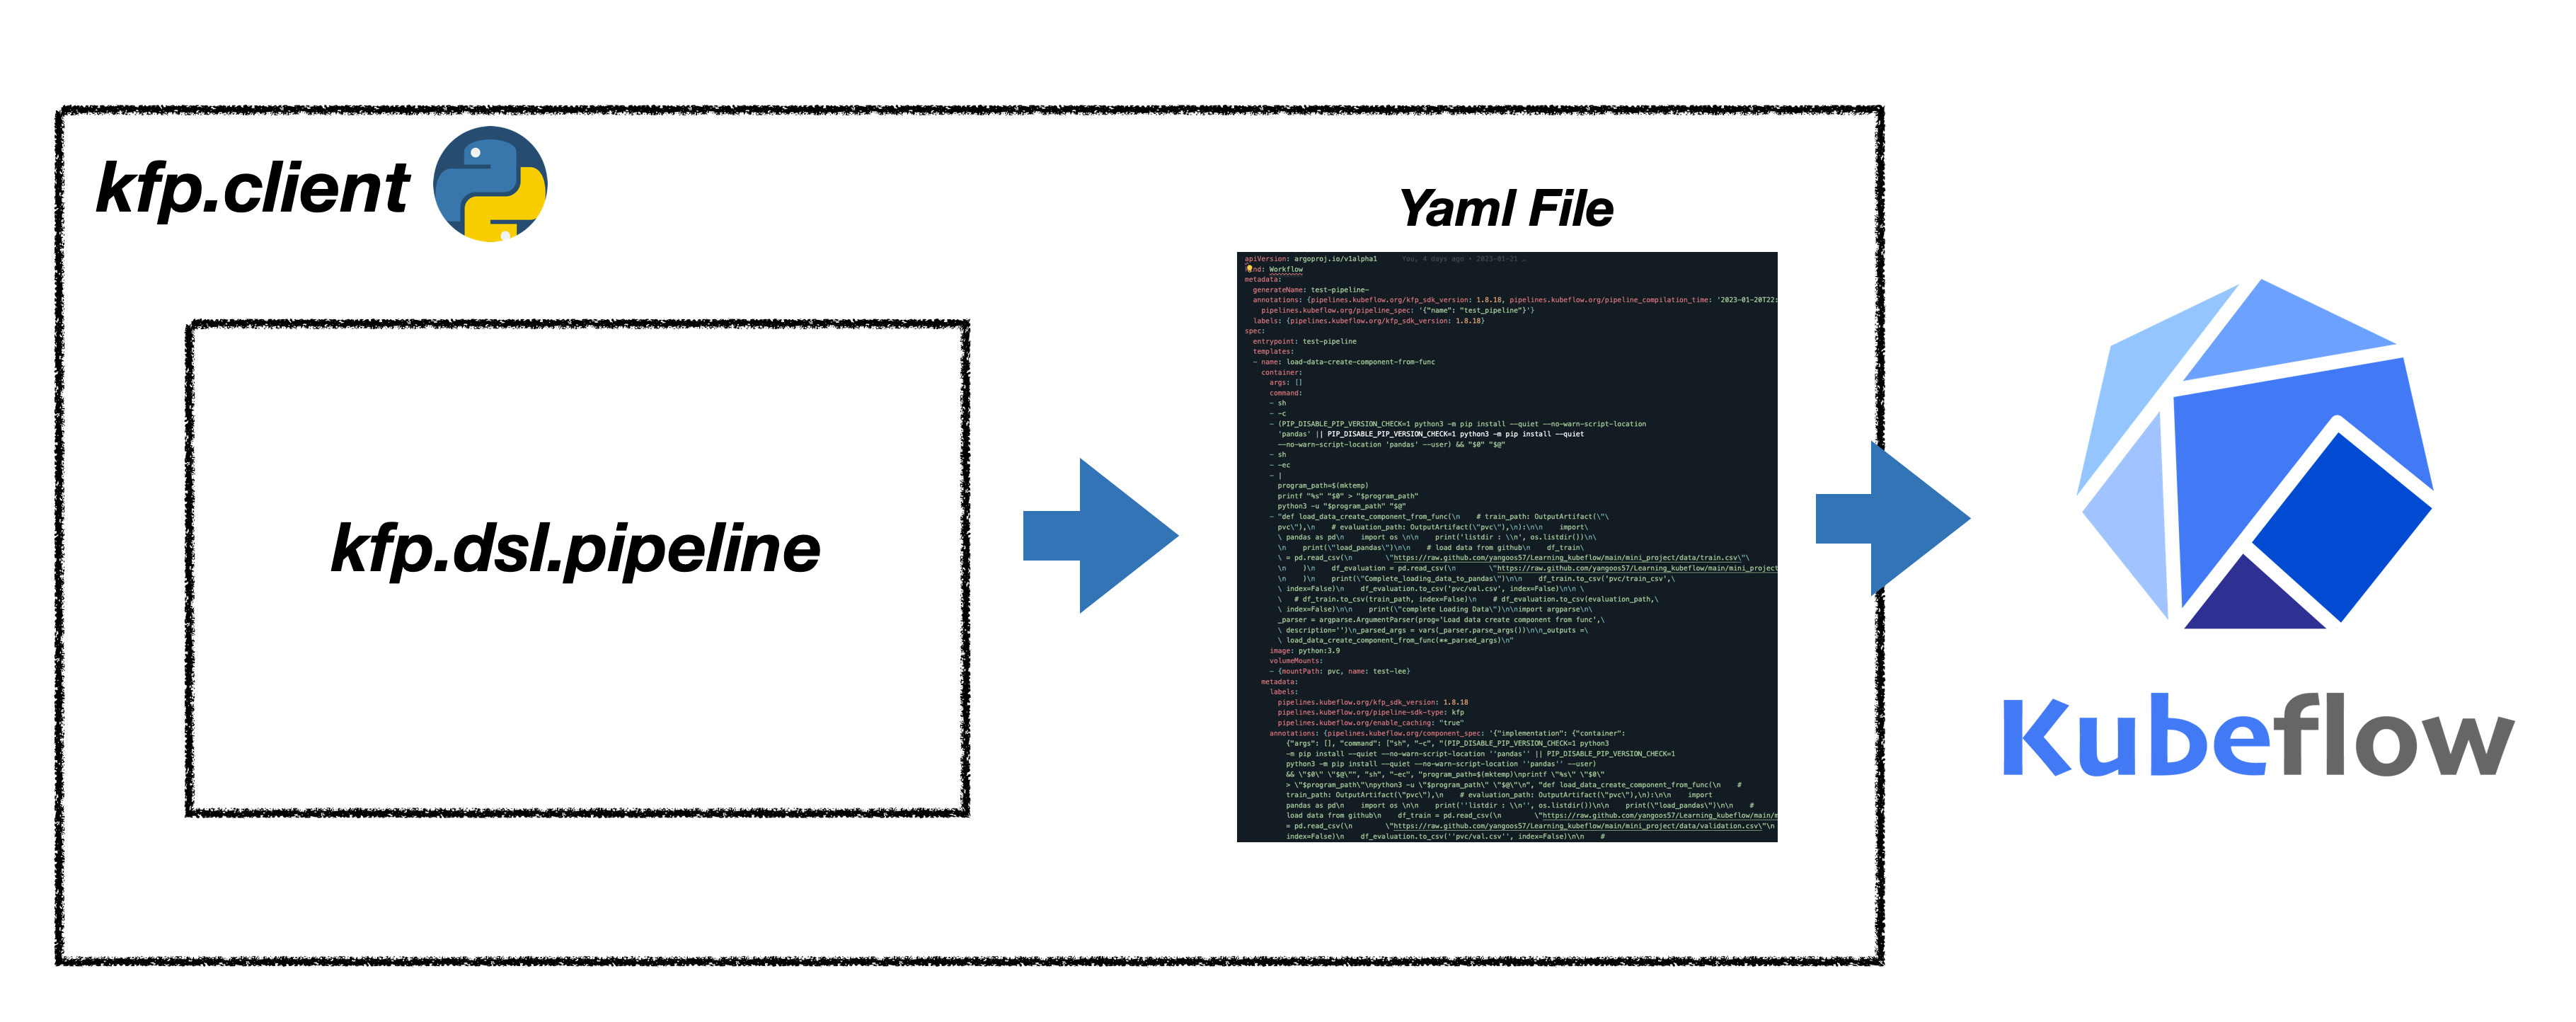
❖ kfp client로 파이프라인 배포
kfp.client를 활용하면 experiment 생성, 파이프라인에 yaml 파일 업로드, 파이프라인 실행 단계를 자동화 할 수 있습니다. 이 외에도 client는 파이프라인 실행 뿐만아니라 모니터링, 삭제, 보관(archive) 등 파이프라인을 관리하는 기능도 지원하고 있습니다.
학습부터 서빙까지 파이프라인 구현
지금까지 KFP SDK를 왜 활용해야하는지, 기본 개념, 일부 클래스에 대해서 설명했습니다. 이제는 직접 KFP SDK를 활용해 아래 그림과 같은 workflow를 가진 파이프라인을 구축해보겠습니다. 파이프라인 구축 예제에 활용된 모델은 🤗 Transformers를 활용해 Torchserve 배포하기에서 설명했던 모델을 활용하겠습니다. 이 글에서는 모델에 관한 설명을 포함하지 않으므로 모델과 관련된 코드가 궁금한 경우 링크를 참고바랍니다.
❖ 학습 평가 데이터 불러오는 컴포넌트 구현
파이프라인 구축에 필요한 컴포넌트를 하나씩 구현하도록 하겠습니다. 먼저 외부에 있는 학습, 평가 데이터를 파이프라인으로 옮기는 컴포넌트를 생성하겠습니다. 학습 데이터는 🤗 Transformers를 활용해 Torchserve 배포하기에서 활용했던 yelp review data를 불러오겠습니다.
데이터를 불러오는 방법은 다양하지만 이 글에서는 github repo에 업로드한 train.csv 파일과 valtidation.csv 파일을 pandas read_csv 매서드를 통해 불러오도록 하겠습니다. 이때 다운받은 데이터는 PVC에 저장해서 다음 컴포넌트에서 사용하도록 설정합니다. 이 글에선 PVC를 활용할 예정이므로 저장 경로 설정 시 outputpath 매서드를 사용하지 않고 일반적인 상대 경로를 활용해야 합니다. PVC와 컴포넌트를 연결하는 방법에 대한 자세한 설명은 파이프라인 생성 항목에서 다루고 있습니다.
outputpath를 사용하면 Minio 저장소에 저장되므로 개별 컴포넌트에서 생성한 결과물들을 외부에서 확인하거나, 다른 컴포넌트에서 파일을 불러오는데에 어려움이 있습니다. PVC를 생성해 개별 컴포넌트의 결과물을 관리한다면 컴포넌트의 결과물들을 Jupyterlab에서 간편하게 확인할 수 있고 다른 컴포넌트에서도 손쉽게 불러올 수 있으므로 이번 예제에서는 PVC를 활용하고 있습니다.
from functools import partial
from kfp.components import create_component_from_func


@partial(
    create_component_from_func,
    packages_to_install=["pandas"],
)
def load_data():

    import pandas as pd
    import os

    # 경로 확인 용
    print("list_dir : \n ", os.listdir())

    # load data from github
    df_train = pd.read_csv(
        "https://raw.github.com/yangoos57/Learning_kubeflow/main/mini_project/data/train.csv"
    )
    df_evaluation = pd.read_csv(
        "https://raw.github.com/yangoos57/Learning_kubeflow/main/mini_project/data/validation.csv"
    )

    df_train.to_csv("pvc/train.csv", index=False)
    df_evaluation.to_csv("pvc/evaluation.csv", index=False)

    print("complete Loading Data")
❖ 모델 학습 및 모델 파일을 저장하는 컴포넌트 구현
두번째 컴포넌트는 모델을 학습하고 & Mar file 생성에 필요한 파일을 pvc에 저장하는 과정을 수행합니다. 먼저 🤗 Transformers를 활용해 Text classification 모델을 학습합니다. 학습이 완료되면 Mar file 생성에 필요한 파일인 Model 파일, Tokenizer 파일, handler.py, config.properties을 pvc에 저장합니다.
별도의 파일 업로드 & 다운로드 과정을 생략하기 위해 handler.py와 config.properties는 코드를 붙여넣는 방식으로 구현했습니다.
@partial(create_component_from_func, base_image="679oose/python_huggingface")
def train_model():

    from transformers import (
        DistilBertForSequenceClassification,
        DistilBertTokenizer,
        Trainer,
        TrainingArguments,
        TrainerCallback,
    )

    from datasets import Dataset

    import os

    # 경로 확인 용
    print("list_dir : \n ", os.listdir())
    print("list_dir : \n ", os.getcwd())
    os.chdir("/")

    train_dataset = Dataset.from_csv("pvc/train.csv").select(range(32))
    evaluation_dataset = Dataset.from_csv("pvc/evaluation.csv")

    # tokenizing
    tokenizer = DistilBertTokenizer.from_pretrained("distilbert-base-uncased")

    def tokenize_function(item):
        return tokenizer(item["text"], padding="max_length", max_length=128, truncation=True)

    train = train_dataset.map(tokenize_function)
    evaluation = evaluation_dataset.map(tokenize_function)

    print("complete Tokenizing")

    model = DistilBertForSequenceClassification.from_pretrained(
        "distilbert-base-uncased", num_labels=len(set(train_dataset["label"]))
    )

    tra_arg = TrainingArguments(
        per_device_train_batch_size=8,
        output_dir="test",
        num_train_epochs=1,
        logging_steps=2,
        # evaluation_strategy="epoch",
        disable_tqdm=True,
        save_strategy="no",
    )

    class myCallback(TrainerCallback):
        def on_log(self, args, state, control, logs=None, **kwargs):
            print(f"{state.global_step} Steps ")

    trainer = Trainer(
        model=model,
        args=tra_arg,
        train_dataset=train,
        eval_dataset=evaluation,
        callbacks=[myCallback],
    )

    trainer.train()

    # Saving Tokenizer, Model
    trainer.save_model("pvc/torch_model")
    tokenizer.save_pretrained("pvc/torch_model")

    print("Saving Model & Tokenizer Complete !!")

    # config for torchserve
    import json
    config = dict(
        inference_address="http://0.0.0.0:8085",
        management_address="http://0.0.0.0:8085",
        metrics_address="http://0.0.0.0:8082",
        grpc_inference_port=7070,
        grpc_management_port=7071,
        enable_envvars_config="true",
        install_py_dep_per_model="true",
        model_store="model-store",
        model_snapshot=json.dumps({
            "name": "startup.cfg",
            "modelCount": 1,
            "models": {
                "torch-model": {  # Model Name
                    "1.0": {
                        "defaultVersion": "true",
                        "marName": "torch-model.mar",
                        "minWorkers": 1,
                        "maxWorkers": 5,
                        "batchSize": 1,
                        "maxBatchDelay": 10,
                        "responseTimeout": 60,
                    }
                }
            },
        }),
    )

    # creating config & config folder
    if not os.path.exists("pvc/torch_model/config"):
        os.mkdir("pvc/torch_model/config")

    with open("pvc/torch_model/config/config.properties", "w") as f:
        for i, j in config.items():
            f.write(f"{i}={j}\n")
        f.close()

    print("Saving config.properties !!")

    # handler for torchserve
    x = '''
from abc import ABC
import json
import logging
import os

import torch
from transformers import AutoModelForSequenceClassification, AutoTokenizer
from ts.torch_handler.base_handler import BaseHandler

logger = logging.getLogger(__name__)


class TransformersClassifierHandler(BaseHandler, ABC):
    def __init__(self):
        super(TransformersClassifierHandler, self).__init__()
        self.initialized = False

    def initialize(self, ctx):
        self.manifest = ctx.manifest

        properties = ctx.system_properties
        model_dir = properties.get("model_dir")
        self.device = torch.device(
            "cuda:" + str(properties.get("gpu_id")) if torch.cuda.is_available() else "cpu"
        )

        # Read model serialize/pt file
        self.model = AutoModelForSequenceClassification.from_pretrained(model_dir)
        self.tokenizer = AutoTokenizer.from_pretrained(model_dir)

        self.model.to(self.device)
        # BetterTransformer
        self.model.eval()

        logger.debug(f"Transformer model from path {model_dir} loaded successfully")

        # Read the mapping file, index to object name
        mapping_file_path = os.path.join(model_dir, "index_to_name.json")

        if os.path.isfile(mapping_file_path):
            with open(mapping_file_path) as f:
                self.mapping = json.load(f)
        else:
            logger.warning(
                "Missing the index_to_name.json file. Inference output will not include class name."
            )

        self.initialized = True

    def preprocess(self, data):
        """Very basic preprocessing code - only tokenizes.
        Extend with your own preprocessing steps as needed.
        """
        print("------- input data --------")
        print(data)
        text = data[0].get("data")
        if text is None:
            text = data[0].get("body")

        logger.info(f"Received text: {text}")

        inputs = self.tokenizer.encode_plus(text, add_special_tokens=True, return_tensors="pt")
        return inputs

    def inference(self, inputs):
        """
        Predict the class of a text using a trained transformer model.
        """
        # NOTE: This makes the assumption that your model expects text to be tokenized
        # with "input_ids" and "token_type_ids" - which is true for some popular transformer models, e.g. bert.
        # If your transformer model expects different tokenization, adapt this code to suit
        # its expected input format.
        inputs = inputs.to(self.device)

        prediction = self.model(**inputs)[0].argmax().item()
        logger.info(f"Model predicted: {prediction}")

        if self.mapping:
            prediction = self.mapping[str(prediction)]
        return [prediction]

    def postprocess(self, inference_output):
        # TODO: Add any needed post-processing of the model predictions here
        logger.info(f"Model Name: {self.model.config._name_or_path}")
        logger.info(f"Model predicted: {inference_output}")
        return inference_output


_service = TransformersClassifierHandler()


def handle(data, context):
    try:
        if not _service.initialized:
            _service.initialize(context)

        if data is None:
            return None

        data = _service.preprocess(data)
        data = _service.inference(data)
        data = _service.postprocess(data)

        return data
    except Exception as e:
        raise e


    '''
    with open("pvc/torch_model/handler.py", "w") as f:
        f.write(x)
    f.close()

    print("Saving handler.py complete !!")
❖ mar file을 생성하는 컴포넌트 구현
pvc에 저장된 파일을 활용해 TorchServe 구동에 필요한 Mar file을 생성하겠습니다. Mar file 생성은 bash에서 python 명령어로 실행하므로 create_component_from_func 와 같은 매서드 대신 ContainerOp을 직접 불러와 사용합니다. bash 명령어는 pvc/torch_model 경로로 이동 => Torchserve 라이브러리 설치 => torch-model-archiver 실행 순으로 진행됩니다.
from kfp.dsl import ContainerOp


def create_marfile():
    return ContainerOp(
        name="Creating Marfile",
        command=["/bin/sh"],
        image="python:3.9",
        arguments=[
            "-c",
            "cd pvc/torch_model; pip install torchserve torch-model-archiver torch-workflow-archiver; torch-model-archiver --model-name torch-model --version 1.0 --serialized-file pytorch_model.bin --handler handler.py --extra-files config.json,vocab.txt --force; mkdir model-store; mv -f torch-model.mar model-store"
        ],  # pip install => create mar file => make model_store folder => mv marfile to model_store
    )
❖ 모델을 서빙하는 컴포넌트 구현
파이프라인에서 서빙 모델을 배포하기 위해선 위해선 kserve client를 사용해아합니다. kserve client를 활용해 직접 컴포넌트를 구현하는 방법도 있지만, 이미 만들어져있는 Kserve component를 활용하겠습니다. 사용할 component는 kubeflow Github 페이지에 업로드 되어있습니다.
kserve component는 kserve 0.7.0 버전을 사용하지만 kubeflow 1.6.1 버전에서 에러없이 정상 실행할 수 있습니다.
kserve_component를 활용해 모델명, namespace, marfile이 저장된 경로, 사용하는 프레임워크를 인자로 넣으면 서빙하려는 모델을 간단하게 배포할 수 있습니다.
from kfp.components import load_component_from_url

def create_inference_model():
    kserve_op = load_component_from_url('https://raw.githubusercontent.com/kubeflow/pipelines/'
                                               'master/components/kserve/component.yaml')

    model_name = "torchserve"
    namespace = "kubeflow-user-example-com"
    model_uri = "pvc://leeway/torch_model"
    framework="pytorch"

    return kserve_op(action="apply",
              model_name=model_name,
              model_uri=model_uri,
              namespace=namespace,
              framework=framework)
❖ 파이프라인 생성
모든 컴포넌트를 생성했으니 이제 하나의 파이프라인으로 묶어보도록 하겠습니다. 그리고 컴포넌트 단계에서 넣지 못한 쿠버네티스 설정값을 개별 컴포넌트에 추가하도록 하겠습니다. 먼저 모든 컴포넌트들이 공통의 storage를 갖도록 kfp.onprem.mount_pvc 매서드를 적용합니다. kfp.onprem 클래스는 On-promise환경 구축에 필요한 다양한 매서드를 담고 있습니다. 다음으로 컴포넌트가 순차적으로 진행될 수 있도록 after 매서드로 이어서 수행될 컴포넌트를 지정합니다. 일부 컴포넌트엔 resource limit을 부여합니다.
PVC는 kubeflow dashboard의 volume 항목에서 먼저 생성합니다.
from kfp.dsl import ContainerOp, pipeline
from kfp import onprem


@pipeline(name="NLP_Pipeline")
def NLP_Pipeline():
    ### 데이터 로드
    data = load_data()
    data.apply(onprem.mount_pvc(pvc_name="leeway", volume_name="test-lee", volume_mount_path="pvc"))


    ### 모델 학습
    model = train_model()
    model.apply(onprem.mount_pvc(pvc_name="leeway", volume_name="test-lee", volume_mount_path="pvc"))
    model.set_cpu_limit(cpu="1").set_memory_limit(memory="2G")
    model.set_display_name("Finetuning Text Classification Model")
    model.after(data)


    ### Mar file 생성
    marfile = create_marfile()
    marfile.apply(onprem.mount_pvc(pvc_name="leeway", volume_name="test-lee", volume_mount_path="pvc"))
    marfile.set_display_name("Creating Marfile")
    marfile.execution_options.caching_strategy.max_cache_staleness = "P0D" # cache 사용않는 옶션
    marfile.after(model)


    ### 모델 서빙
    inference_model = create_inference_model()
    inference_model.apply(onprem.mount_pvc(pvc_name="leeway", volume_name="test-lee", volume_mount_path="pvc"))
    inference_model.after(marfile)
❖ KFP Client를 활용해 파이프라인 배포
KFP Client를 활용해 파이프라인을 실행시키겠습니다. 외부 주소(localhost:8080)를 통해 접근하는 예제이므로 isti-ingressgateway가 개방된 상태인지 확인해주세요.
kubeflow의 jupyter notebook으로 파이프라인을 배포할 경우 코드 내부의 Kubeflow endpoint를 내부 주소(Cluster IP)로 변경해서 사용해야 합니다. jupyter notebook에서 kfp로의 접근은 클러스터 내부에서 내부로 접근하는 것이므로 localhost:8080으로 접근하면
Connection refused에러가 발생합니다.
https를 사용하는 경우
cert_for_kubeflow환경변수를 인증서가 위치한 경로에 맞게 재설정해야합니다. 인증서 없이 우회해서 사용하는 경우 kubeflow 인증 문제 해결하기를 참고해 서버 통신에 필요한 인증서를 생성해야 합니다.
import re
import requests
from urllib.parse import urlsplit
import os

# https 사용 시 인증서 등록
os.environ["cert_for_kubeflow"] = "/Users/git_repo/Learning_kubeflow/manifests/deployment/cert/leeway.crt"


def get_istio_auth_session(url: str, username: str, password: str) -> dict:
    """
    Determine if the specified URL is secured by Dex and try to obtain a session cookie.
    WARNING: only Dex `staticPasswords` and `LDAP` authentication are currently supported
             (we default default to using `staticPasswords` if both are enabled)

    :param url: Kubeflow server URL, including protocol
    :param username: Dex `staticPasswords` or `LDAP` username
    :param password: Dex `staticPasswords` or `LDAP` password
    :return: auth session information
    """
    # define the default return object
    auth_session = {
        "endpoint_url": url,  # KF endpoint URL
        "redirect_url": None,  # KF redirect URL, if applicable
        "dex_login_url": None,  # Dex login URL (for POST of credentials)
        "is_secured": None,  # True if KF endpoint is secured
        "session_cookie": None,  # Resulting session cookies in the form "key1=value1; key2=value2"
    }

    # use a persistent session (for cookies)
    with requests.Session() as s:

        ################
        # Determine if Endpoint is Secured
        ################
        resp = s.get(url, allow_redirects=True, verify=os.getenv("cert_for_kubeflow"))
        if resp.status_code != 200:
            raise RuntimeError(f"HTTP status code '{resp.status_code}' for GET against: {url}")

        auth_session["redirect_url"] = resp.url

        # if we were NOT redirected, then the endpoint is UNSECURED
        if len(resp.history) == 0:
            auth_session["is_secured"] = False
            return auth_session
        else:
            auth_session["is_secured"] = True

        ################
        # Get Dex Login URL
        ################
        redirect_url_obj = urlsplit(auth_session["redirect_url"])

        # if we are at `/auth?=xxxx` path, we need to select an auth type
        if re.search(r"/auth$", redirect_url_obj.path):

            #######
            # TIP: choose the default auth type by including ONE of the following
            #######

            # OPTION 1: set "staticPasswords" as default auth type
            redirect_url_obj = redirect_url_obj._replace(
                path=re.sub(r"/auth$", "/auth/local", redirect_url_obj.path)
            )
            # OPTION 2: set "ldap" as default auth type
            # redirect_url_obj = redirect_url_obj._replace(
            #     path=re.sub(r"/auth$", "/auth/ldap", redirect_url_obj.path)
            # )

        # if we are at `/auth/xxxx/login` path, then no further action is needed (we can use it for login POST)
        if re.search(r"/auth/.*/login$", redirect_url_obj.path):
            auth_session["dex_login_url"] = redirect_url_obj.geturl()

        # else, we need to be redirected to the actual login page
        else:
            # this GET should redirect us to the `/auth/xxxx/login` path
            resp = s.get(redirect_url_obj.geturl(), allow_redirects=True)
            if resp.status_code != 200:
                raise RuntimeError(
                    f"HTTP status code '{resp.status_code}' for GET against: {redirect_url_obj.geturl()}"
                )

            # set the login url
            auth_session["dex_login_url"] = resp.url

        ################
        # Attempt Dex Login
        ################
        resp = s.post(
            auth_session["dex_login_url"],
            data={"login": username, "password": password},
            allow_redirects=True,
        )
        if len(resp.history) == 0:
            raise RuntimeError(
                f"Login credentials were probably invalid - "
                f"No redirect after POST to: {auth_session['dex_login_url']}"
            )

        # store the session cookies in a "key1=value1; key2=value2" string
        auth_session["session_cookie"] = "; ".join([f"{c.name}={c.value}" for c in s.cookies])
    return auth_session


import kfp
import os

KUBEFLOW_ENDPOINT = "https://localhost:8080"
KUBEFLOW_USERNAME = "user@example.com"
KUBEFLOW_PASSWORD = "12341234"


auth_session = get_istio_auth_session(
    url=KUBEFLOW_ENDPOINT, username=KUBEFLOW_USERNAME, password=KUBEFLOW_PASSWORD
)

client = kfp.Client(
    host=f"{KUBEFLOW_ENDPOINT}/pipeline",
    cookies=auth_session["session_cookie"],
    ssl_ca_cert=os.getenv("cert_for_kubeflow"),
)

if __name__ == "__main__":
    client.create_run_from_pipeline_func(
        NLP_Pipeline, arguments={}, namespace="kubeflow-user-example-com"
    )
❖ 파이프라인 정상 배포 여부 체크
파이프라인 실행을 완료했다면 모델 서빙이 정상적으로 이뤄졌는지 요청(request)을 보내겠습니다.
torchserve_name = "torch-model"
model_name = "torchserve"
url = f"https://localhost:8080/v1/models/{torchserve_name}:predict"
host = f"{model_name}.kubeflow-user-example-com.example.com"
session={'authservice_session':auth_session["session_cookie"].replace('authservice_session=','')}
data = {"instances": [{"data": "Hello World!"}]}  # data

x = requests.post(
    url=url, verify=False, cookies=session, headers={"Host": host}, json=data
)
x.text
torchserve_name은 config.properties의 model_snapshot에서 확인하거나 아래와 같이 kserve_container 로그에 들어가 확인 할 수 있습니다.